
Links & Resources
DESIGN PROCESS
IDEO Method Cards
Card kit focused on the human-centered design process, created by the firm IDEO. From IDEO: “IDEO Method Cards are a tool to showcase methods we use to inspire great design and keep people at the center of our design process. Each of the 51 cards describes one method and includes a brief story about how and when to use it.”
UNIVERSAL METHODS OF DESIGN (PDF)
INTERACTIVE DESIGN
UNIVERSAL PRINCIPLES OF DESIGN (PDF)
THE BASICS OF UX DESIGN (PDF)
PARTICIPATORY WORK
CANDY CHANG
WORK, CANDY CHANG
INFORMATION DESIGN & DATA VISUALIZATION
NICHOLAS FELTRON
VISUAL CINNAMON
DEAR DATA
LISA STRAUSFELD (INFORMATION ART)
HTTPS://INFORMATIONART.COM
HTTPS://INFORMATIONART.COM/PROJECTS/MAD
HTTPS://INFORMATIONART.COM/PROJECTS/AIC
HTTPS://INFORMATIONART.COM/PROJECTS/MILLENNIUM-PROJECT
INFORMATION IS BEAUTIFUL
TYPOGRAPHY
+ “Finer Points” of Text Typography
Go through the checklist on the Handout PDF here >
+ TIP – Aligning Baselines in Multi-column Grid
In your Annual Report, baselines across columns (on your multi-column grid) should align. To do this, you can use the Align to Baseline Grid function in InDesign if you want. Below is a link to describe how to do this.
Aligning To Baseline Grid >
+ TIP – Don’t Hyphenate Proper Nouns (capitalized words):
To prevent capitalized words from being hyphenated, deselect this option under Paragraph > Hyphenation within InDesign. Scfroll down on this page and find “Set Automatic Hyphen Options for a Paragraph.”
How to Control Hyphenation >
+ TIP – Paragraph Flow in Multi-Column Grid Design
If you have a paragraph that ends with only 1-2 lines fitting at the bottom of a column, move the entire paragraph to start in the next column over.
THE GRID
Samara, Tim: Making & Breaking The Grid (Excerpt – print design)
Samara, Tim: Making & Breaking The Grid (Excerpt – interactive design)
Video: Setting up Grid in InDesign
Mastering Grids (Creative Bloq)
Designing with Grids in InDesign (Lynda.com tutorial)
Some Table of Contents Examples PDF
BOOK DESIGN
+ Parts of a Book
Parts-of-a-book-diagram
+ Table of Contents Inspirations
Some Table of Contents Examples PDF
BOOK BINDING
Bookbinding Tools and Materials List
Cutting Mat
X-Acto Knife
Metal Ruler (with cork on underside preferred for safety)
Precise ruler for measuring (thin and/or translucent ones best)
Pencil
Bone Folder > (for scoring, if needed)
Paper Tape from Pharmacy or 3M > 3M 1530-1 Micropore Tape (Pack of 12) – Amazon
Small and/or Medium synthetic brushes (if using glue)
Bookbinding glue such as Lineco
General Bookbinding Video Tutorials:
Book Binding Tools by Sea Lemon
How To Choose Paper and Cover Stock
All About Bookbinding, including Materials and Master List of Tutorials
Buy Bookbinding Materials Online (Blick Art Materials)
Buy Bookbinding Materials Online (Talas)
Accordion-fold Binding
• Bind pages together by taping on back with paper tape, and attaching all pages together, as I demonstrated in class. (If you need a blank somewhere, this needs to be bound in as well.)
• Create Cover InDesign document (document should be 16″ high x approx. 20.25″ wide (add .25″ or more depending on your book width once bound to accommodate your spine). Print out with crop marks, score and fold, and connect to back cover of Editorial.
Accordion-fold Binding Video Tutorials:
Accordion-Fold Book Instructions
Perfect Binding with Liquid Glue
1. Assemble your book block (single pages stacked together). There are two different options for how you prepare these pages:
• Print your pages individually (with crop marks and “bleed”), 2-sided.
You can use thinner/text weight paper or the heavier weight paper but choose based on the look-and-feel you are aiming for.
(or)
• Print your pages individually (with crop marks and “bleed”), 1-sided and laminate together to create “back” and “front” (adhere pages together with spray mount or studio tak).
2. Gather all pages in order and carefully adjust to make sure all are aligned to one another.
3. Have two or more binder clips to help keep your book block organized and together while binding Clamp opposite edge of pages with binder clips so that the “spine” end is free and ready to be glued.
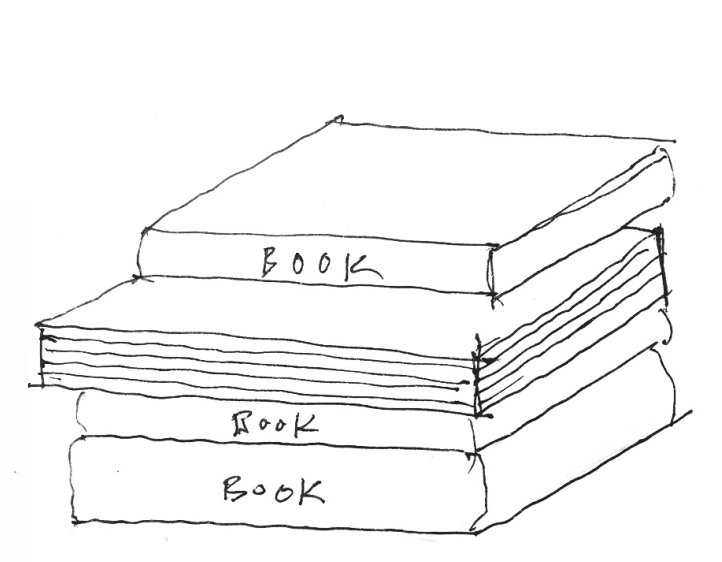
4. Use 3-4 heavy books to make a DIY “book press” that you will use to hold your book during the gluing process (As I demonstrated in class.)
See schematic drawings and instructions for this method (PDF) >
Stack books and “sandwich” your book block (all interior pages) with the “spine” edge hanging out. (See image below.)
5. Glue book edge using bookbinding glue in thin layers. Carefully coat the “spine” edge with glue and then let it dry for 15-20 minutes before you put on the next layer. Do 5-6 layers of glue, letting each dry between applications.
How to Attach Cover to Book Block
Order of operations:
– cut cover out using bleed edge (not crops) all sides – slightly “in” so no white edge
– place finished book block down on top of cover and figure out where spine should be (closing book around it to check overall book width and height)
– measure for where spine score should be on “inside cover” side
If 1/8” spine, then measure in from right edge 10+1/8” for first score, then flip book around and do the same from other side to figure out where second score goes
– score spine
– fold spine scores carefully from the “outside cover” side, working along score using your fingers, teasing it into folded position little by little
– put book block in to check fit of spine and finalize where to cut cover height and width
– add the 2 additional scores (.25”-.5” from first scores) Fold these in opposite direction, teasing along score as you did above.
– fold the additional scores (these will allow book to open when book is closed)
– put glue on book block edge AND inside entire “u” of spine
– place book block inside and clamp with binder clips facing down towards book spine
– stand up to dry using reams of paper
– let dry 30 min minimum
– check edges and trim open long edge, cutting through covers and pages carefully. Must use sharp/new x-acto blade and go slowly and carefully. Many strokes to cut.
– repeat this on short edge top/bottom only if necc.
Perfect Binding Video Tutorials:
DIY Perfect Bookbinding Tutorial
Handout
bookbindingschematic PDF
This handout describes how to do a perfect-bound binding, and how to attach a cover to either a perfect bound book or accordion-fold bound book.
The only difference is that for the perfect-bind you would not be folding sheets for the “French fold” method because of the size of the Editorial and printing – they will be single pages.
Misc Bookbinding Links
http://badgerandchirp.blogspot.com/p/tutorials_12.html
—
Image: IDEO Method Card (detail)