Measure Twice, Cut Once
You are almost finished, do not forget a final edit pass!
TYPOGRAPHY
+ See Ellen Lupton, “Thinking With Type” (full book PDF) >
+ See Robert Bringhurst, whose book on print design catalogs this, web typography reference here: http://webtypography.net/toc/) >
+ Mockup Resources
free mockup zone> graphic pear > mockup tree > mockup world > pexels >
+ Grid Refresh:
“Making and Breaking the Grid: A Graphic Design Layout Workshop” by Timothy Samara >
Pg 23: “Anatomy of the Grid: The Basic Parts of A Page”
Examples: Manuscript grid, Column, Modular, Hierarchal, Variation and Violation, etc.
Pg 32: Review “Exhibits”/Inspiration
+ Spell Check all of Your Work!
+ Review all design and refine rags, look for and fix extra spaces, and other typographical errors. (See “Finer Points” handout below)
To create a good rag, pay attention to the shape that the ragged line endings make. A good rag goes in and out from line to line in small increments. A poor rag creates distracting shapes of white space, i.e. “curves” or “holes,” etc. The only way to get a nice rag is to adjust it by hand. In some cases you may need to (sparingly) hyphenate very long words that create large “holes.”
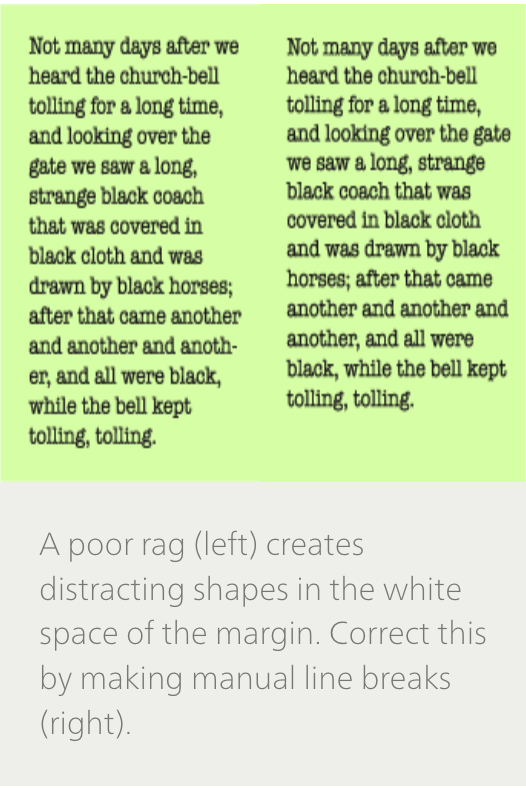
[Source: https://www.fonts.com/content/learning/fontology/level-2/text-typography/rags-widows-orphans] ?\>
+ Checklist on the “Finer Points” of Text Typography
Go through the checklist on the Handout PDF here >
+ Aligning Baselines in Multi-column Grid
In your book/publication, baselines across columns (on your multi-column grid) should align. To do this, you can use the Align to Baseline Grid function in InDesign if you want. Below is a link to describe how to do this.
Aligning To Baseline Grid >
+ Turn Off Automatic Hyphenation
“Select all” type within each paragraph/text box. Then in InDesign go to: Window menu > Type > Paragraph > Hyphenation. Then de-select “hyphenation” to turn IT off. Don’t Hyphenate Proper Nouns (capitalized words). This will also prevent capitalized words from being hyphenated. For more info, scroll down on this page and find “Set Automatic Hyphen Options for a Paragraph.”How to Control Hyphenation >
+ Paragraph Flow in Multi-Column Grid Design
If you have a paragraph that ends with only 1-2 lines fitting at the bottom of a column, move the entire paragraph to start in the next column over.
+ Indents
Only use indents if paragraphs are not already separated by line breaks.
+ Page Numbers
Include page numbers unless there is a strong reason not to.
+ Use curly quotes (“ ” ) instead of straight quotes. (Key command, option+shift+left bracket and option+left bracket).
+ “Hang” Punctuation
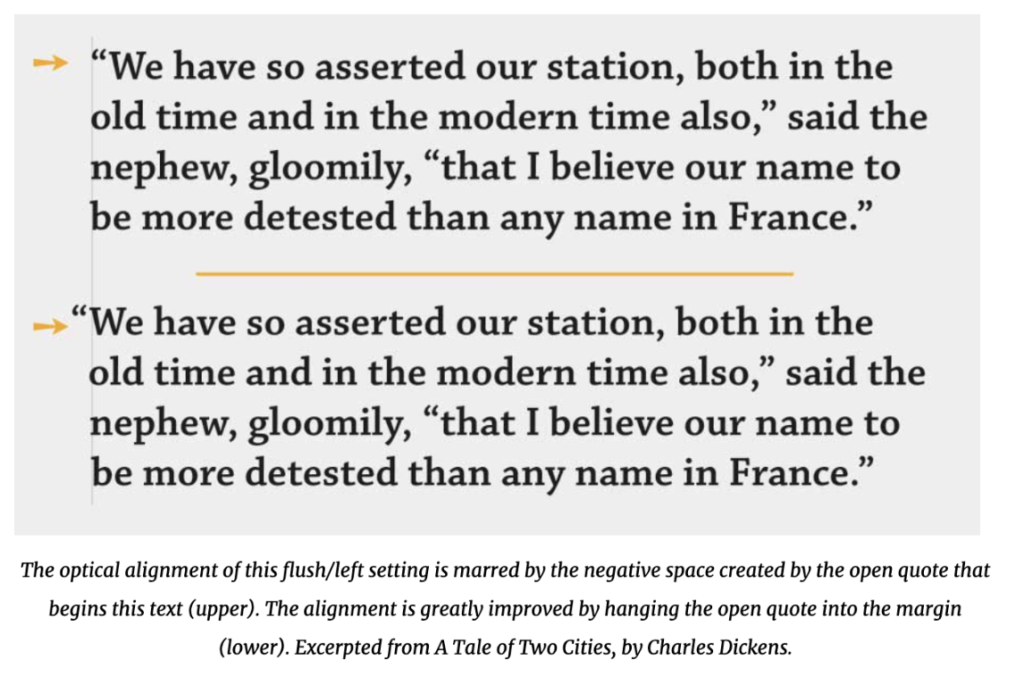
Hang punctuation that occurs at the end of lines slightly out in the margins. (See example 2 below). This includes quotation marks, hyphens, periods, etc). In InDesign, use the “Optical Margin Alignment” settings under the Type Menu when this is sufficient.
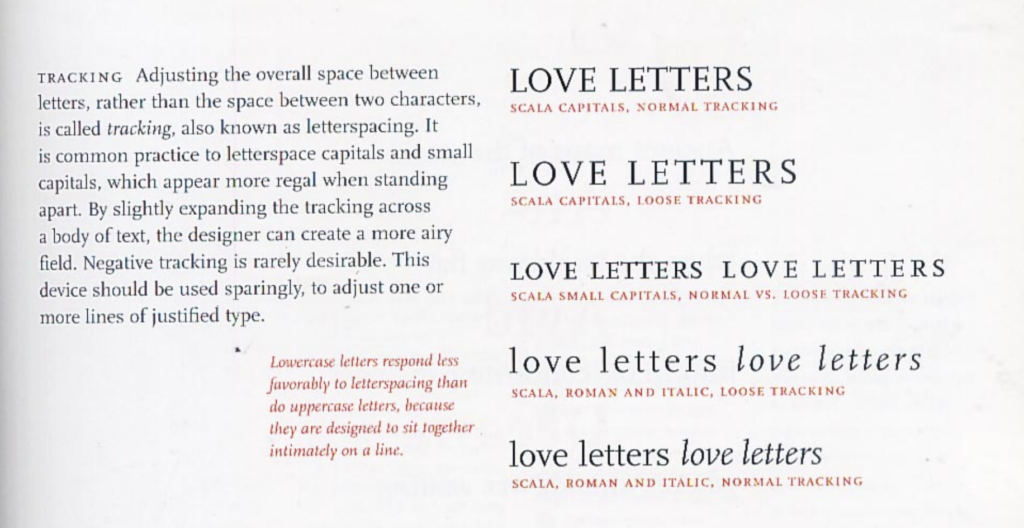
+ Letterspace all strings of All Caps – extra tracking to help balance-out all-caps text settings
Example from Ellen Lupton, “Thinking With Type”
+ Dashes
There are three kinds of dashes: hyphens, en-dashes, and em-dashes. Use spaced en-dashes (–) rather than a hyphen (-) or the long (—) em-dash to set off phrases. Use the em-dash to introduce speakers in a narrative.
+ Widows and Orphans
Look for and Remove all “windows” and “orphans” in your typography. Refresher: widows & orphans >
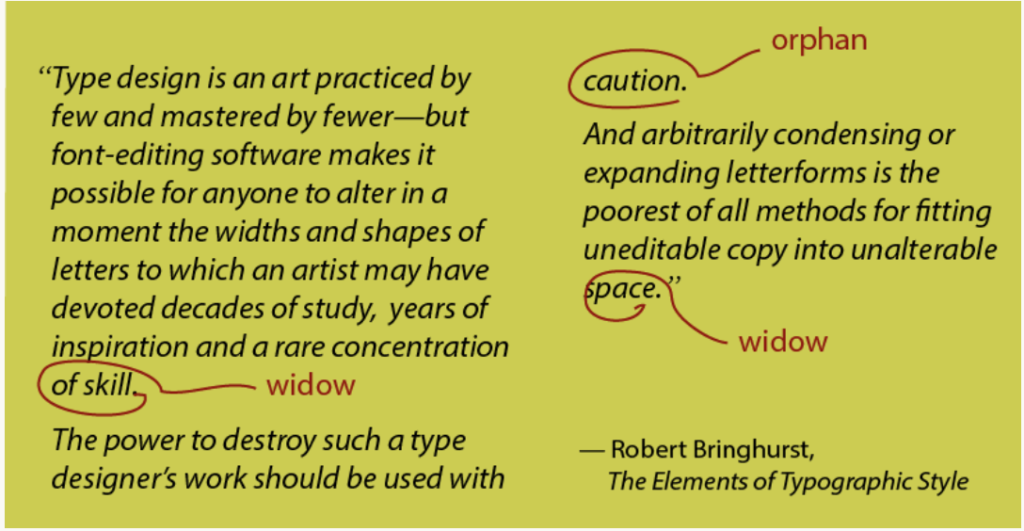
[Source: https://thegoodpage.net/2015/11/21/rags-widows-orphans/] >
+ Parts of a Book Diagram
Here is a PDF of the parts of a book for reference. Note that this is for a very traditional book (which is why it includes both a Title Page and Half Title Page), so use this as a reference as is applicable for the type of book or publication you are creating. Parts of a Book Diagram >
+ Title Page
Some smaller publications such as Magazines and Pamphlets may not have a Title Page, longer publications should.
+ Image Credits
All projects should include a page to give credit to any found imagery and content being used.
Include the page number where image or content is used, title of image, author, and source where you found this image.
+ Bibliography – list of your research, content being used, etc. Set up as you would in an academic essay/paper. (If you are directly using found text content, you may also be able to include this, if a small number of citations, in your Colophon.
+ Colophon – usually the very last thing in a book (See Parts of Book Diagram PDF above). A colophon is a traditional element in a book that provides details on printing, production, typography, and often other specifics about the book, its content, and authorship. Example of what a Colophon for a publication that is one of your capstone medium’s. Bracketed information is what you would fill-in. It could also include additional notes/information on printing or production, such as type of printing process used, etc.
PRODUCTION
+ Printing Books, Posters, etc.
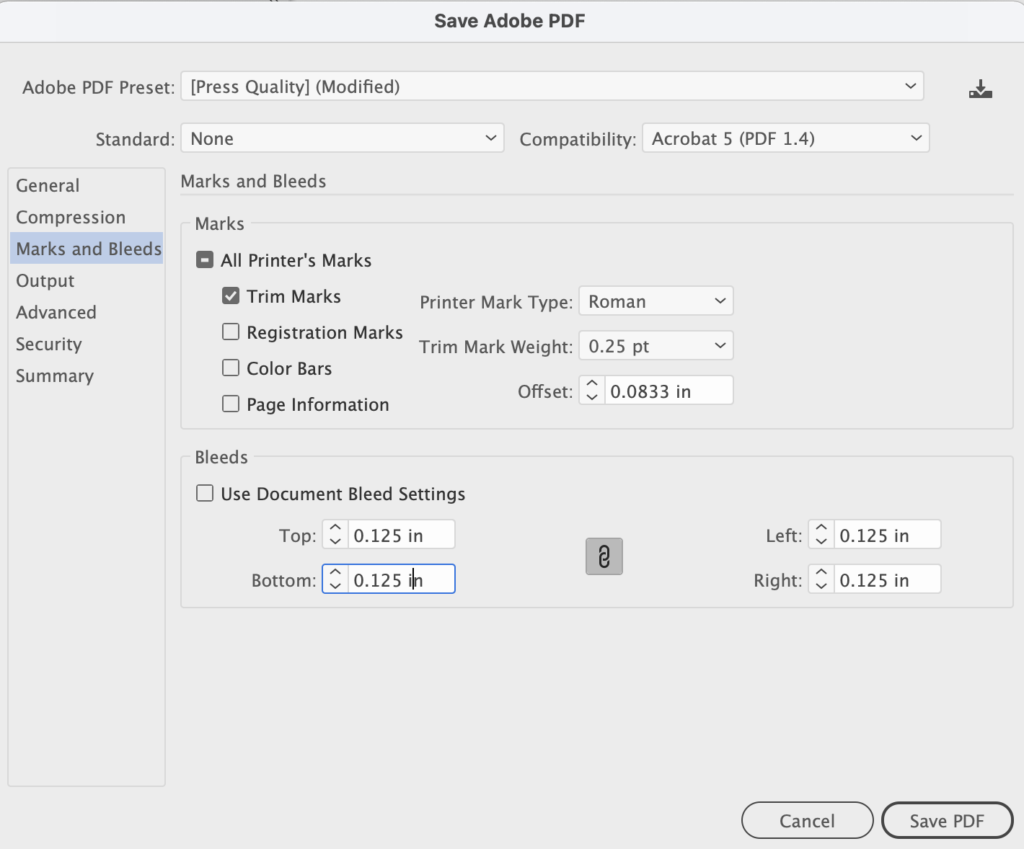
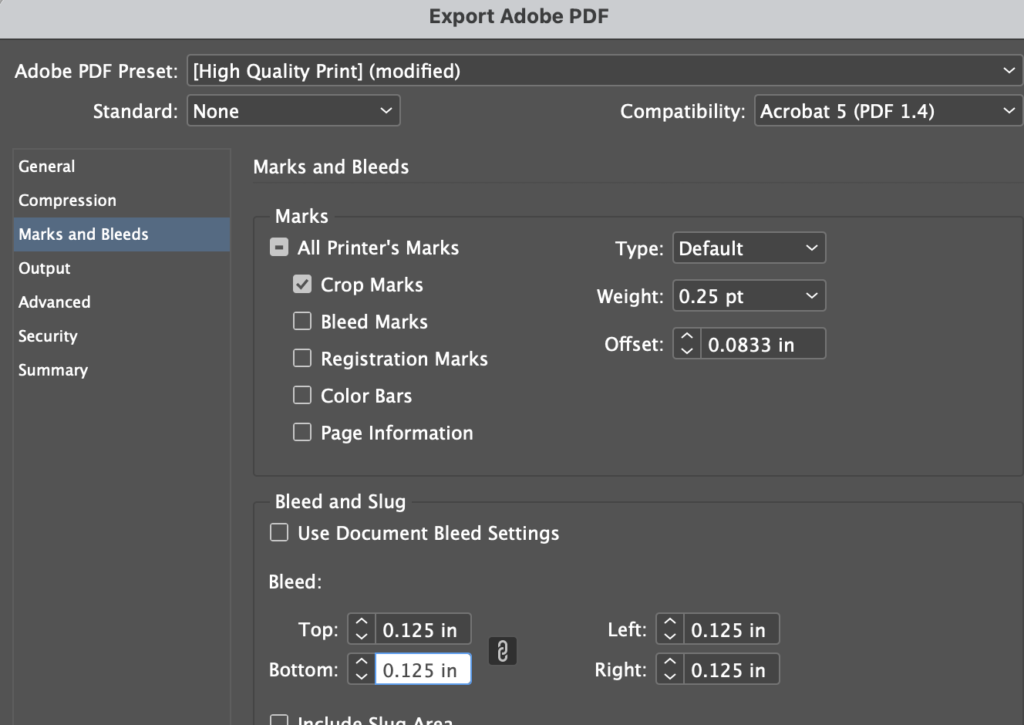
If you are mounting something such as a poster etc., make sure to pull out your “bleeds” (imagery/color/elements that “bleed” off of your page) follow these steps.
1. Pull out “bleeds” in your document (whether InDesign or Illustrator, etc.)
2. After choosing Export (InDesign) or Save As (Illustrator), under General choose whether or not you are exporting a single page or spread (InDesign), or identify which artboards you are exporting.
3. Make sure Compression is “none”
3. Under Marks and Bleeds, select “crop” or “trim” marks and add a measurement for your bleeds (.125 in all boxes will be enough)
Note: As we went over and discussed in class, you will print differently for a book being bound accordion-fold (and printed one side), than you would for a book being perfect bound (and printed 2-sides). The first can be printed as spreads as seen in your InDesign file, while if you are printing 2-sided and perfect binding, you will need to set your document up as “printer spreads” OR print single pages
back and front and then perfect bind.
+ Binding
There are quite a few bookbinding resources on our class site already, but here are a few in one place for easy access re: binding.
Perfect Binding Video Tutorial >
Perfect Binding & Attaching Cover to an accordion-fold bound book >
How to cut a smooth book edge Video > – Perfect for perfect bound single sheet books (cannot do this to accordion-fold books)
Sewing Saddle Stitch Book Video >
Bookbinding Glue >
Even MORE Bookbinding Resources Post >
+ Perfect Binding with ACM Lab Machine
1. The Lab Monitor should be helping you with using the maching
2. Assemble your book block (single pages stacked together)
3. Measure book spine in machine to determine what number setting you need to use
4. *Once you know the spine measurement, get one sheet of newsprint paper from the big newsprint pad in the Lab cabinet where the bookbinding materials are.
5. Measure your spine width with a ruler and measure-out and cut a piece of the newsprint that you will use to wrap around your book when you do the perfect binding.
6. The newsprint should be wide enough to cover some of one side of your book, wrap over the “spine”
to the actual measurements, and then onto the back of your book. (You will end up cutting off the excess of the newsprint when you are done bookbinding which is why it doesn’t need to cover your book.)
7. Cut the glue to the width and length of your book
8. Place the glue on top of the book spine edge and then wrap it with the newsprint paper.
(Now you should have your book block + the glue balanced on the spine edge + covered by the newsprint wrap.)
9. Now take these three parts (pages, glue, newsprint wrap) and select the setting appropriate for the width of your book spine. Once the machine has heated up, place your book down into the bookbinding machine and set the timer. As soon as the timer goes off, take the book out and cool in the rack behind the book binding machine.
+ Perfect Binding with Liquid Glue
1. Assemble your book block (single pages stacked together)
2. Have two or more binder clips to help keep your book block organized and together while binding
3. Use two heavy books to make a DIY “book press” that you will use to hold your book during the gluing process
4. See schematic drawings and instructions for this method (PDF) >
More resources for Bookbinding – see this post:
https://acmgd.info/cms/bookbinding-links-resources/
+ Mounting
1. Follow directions for printing below. Next, spray mount, put studio tac, etc. on the back of your poster (etc.) and then attach to foam core or other mounting surface.
2. Once the print and the foam core/board are attached to one another, use a new sharp x-acto knife and
cut out using the crop marks on your print/
